How to create an Apple ID – Learn how to signup or create a new iCloud account from your Mac, iPhone, iPad and Windows devices and use Apple services such as iTunes, App Store, iCloud, and Facetime.
In this Digit Guider, you will learn how to create an Apple ID on
Creating an Apple ID unlocks access to a range of services and features across Apple’s ecosystem.
Apple ID – An Apple ID is a unique account identifier provided by Apple Inc. that serves as a gateway to accessing a wide array of services, content, and features across Apple’s ecosystem of devices and platforms. It enables users to personalize and enhance their digital experience by facilitating access to essential services such as the App Store, iTunes Store, iCloud, FaceTime, iMessage, Apple Music, Apple Pay, and more. With an Apple ID, users can securely manage their purchases, subscriptions, data storage, communications, and device security settings, while also benefiting from seamless synchronization and integration across their Apple devices. In essence, an Apple ID is the key that unlocks the full potential of Apple’s interconnected ecosystem, empowering users to stay connected, entertained, productive, and secure in the digital world.
When you set up a new Apple product such as a Macbook, iPhone, iPad, or iPod touch, it asks you to enter an Apple ID. If you already have an account, you can sign in with an existing account or you can create a free Apple ID by providing basic details such as name, date of birth, phone number, etc.
You are allowed to create a new Apple ID from different devices. The following step-by-step instruction helps you how to create a new Apple account on different devices.
How to Create an Apple ID on iPhone
When you are setting up a new iPhone, iPad, or iPod touch, you can create a new account or choose the option set up later in settings.
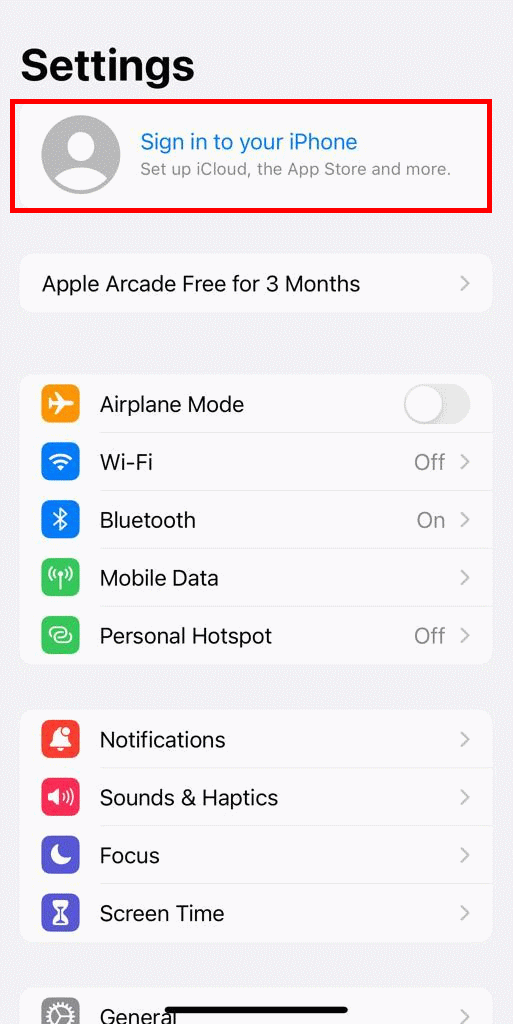
1. On your iPhone, Go to “Settings”
2. Tap on “Sign in to your iPhone“
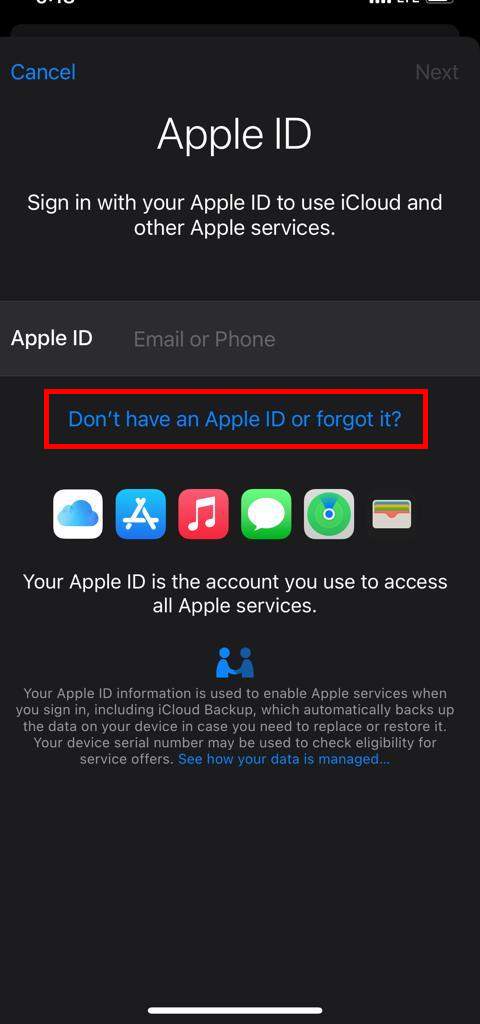
3. On the Apple ID screen, you are allowed to sign in to your Apple account. You can enter the existing Apple ID and password to log in with your existing account.
As we are creating a new account, tap on the option “Don’t have an Apple ID“
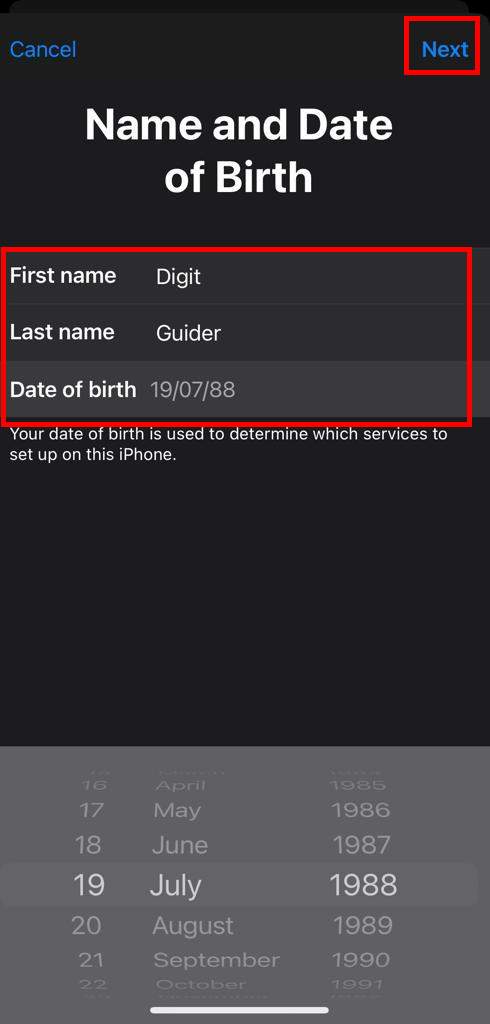
4. Enter your Name and Date of Birth and then click on “Next”
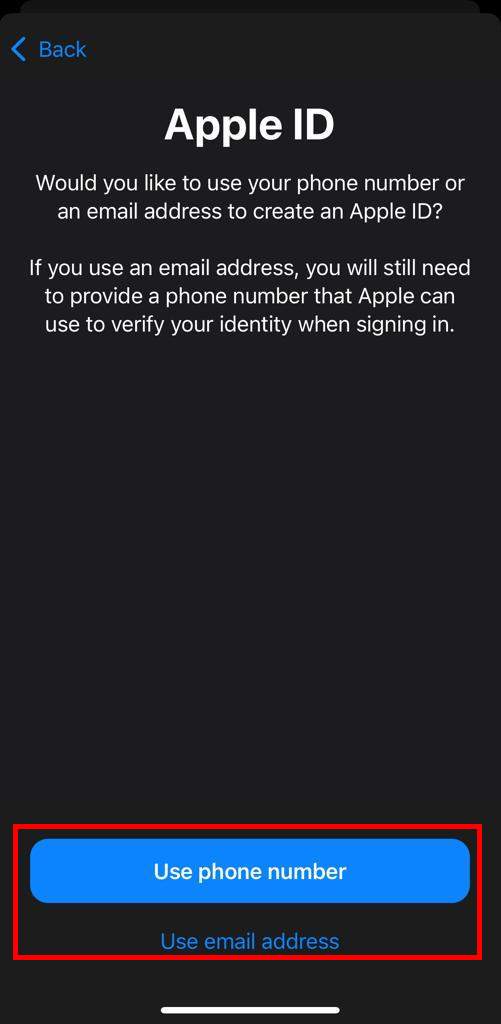
5. Select any one of the options to create a new Apple ID
- Use Phone number
- Use Email address
Note: In this scenario, we are creating a new ID using a phone number.
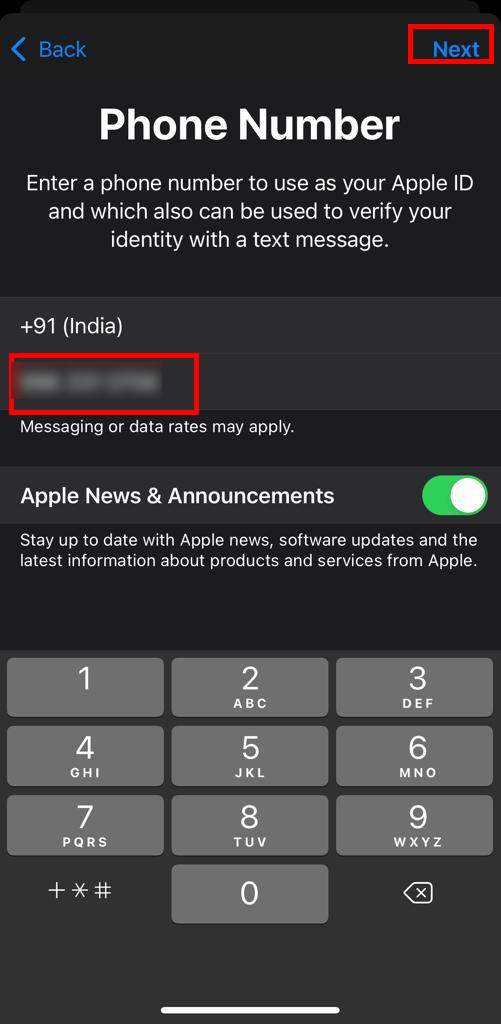
6. Enter a Phone number and tap on “Next”
7. Now enter a verification code that you have received to your phone number
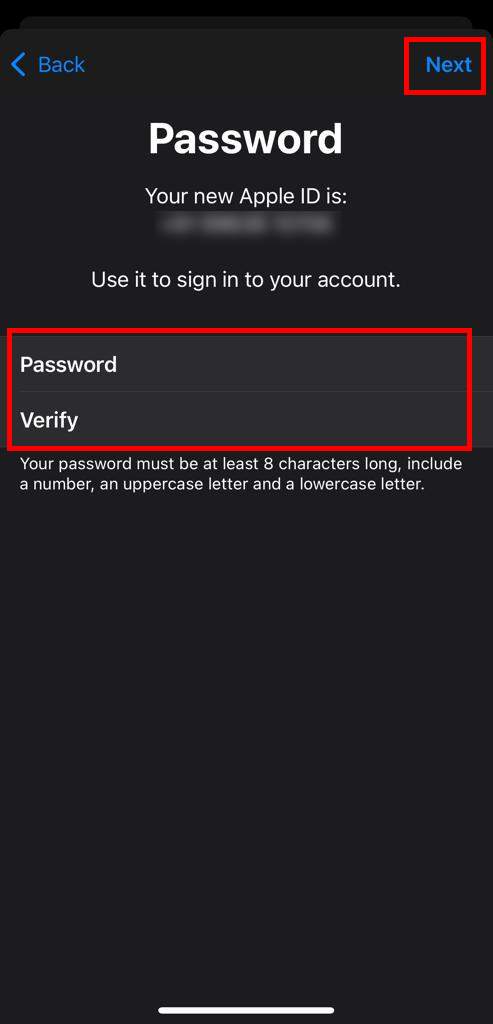
8. Enter the password for your new Apple ID and tap on “Next”
9. Tap on “Agree” to accept terms and conditions.
Successfully, a new Apple ID has been created on your iPhone.
How to Create an Apple ID on Mac
1. On your Mac computer, choose Apple Menu and then click on “System Preferences”
2. Click on Sign In
3. Click on “Create Apple ID”
4. Enter the following details
- Password with verified password
- Accept the terms and conditions
5. In the next screen update your personal information and click on next
6. Update credit card and billing information and click on continue.
Note: You are not charged by Apple until you purchase the Apple services
7. The final step is verification of Email. Check the Email and verify your Email address
How to Create Apple ID on a Windows Computer
1. On your Windows PC, open an iTunes app and make sure you have the latest version. You can download the latest version from apple.com/itunes
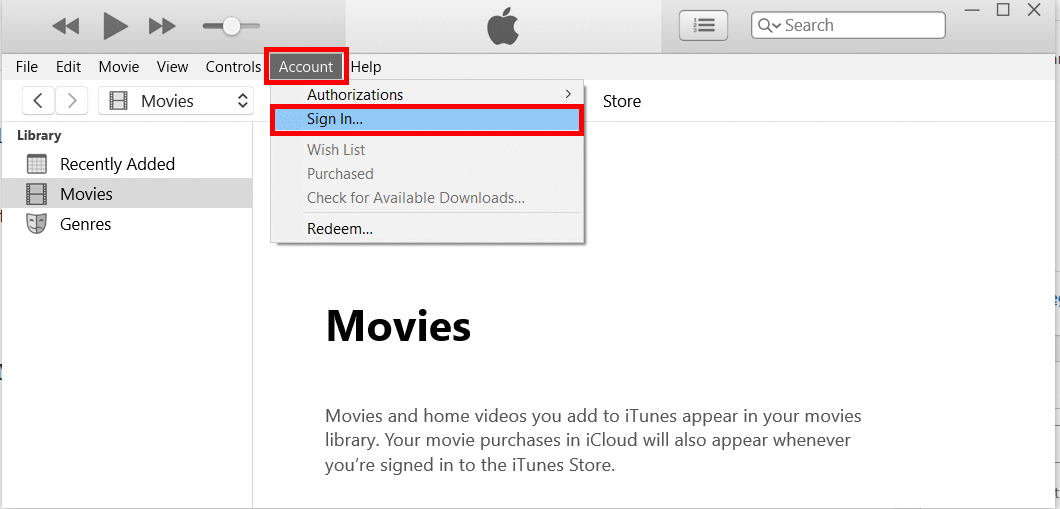
2. At the top of the iTunes menu, choose “Account” and then click on “Sign In“
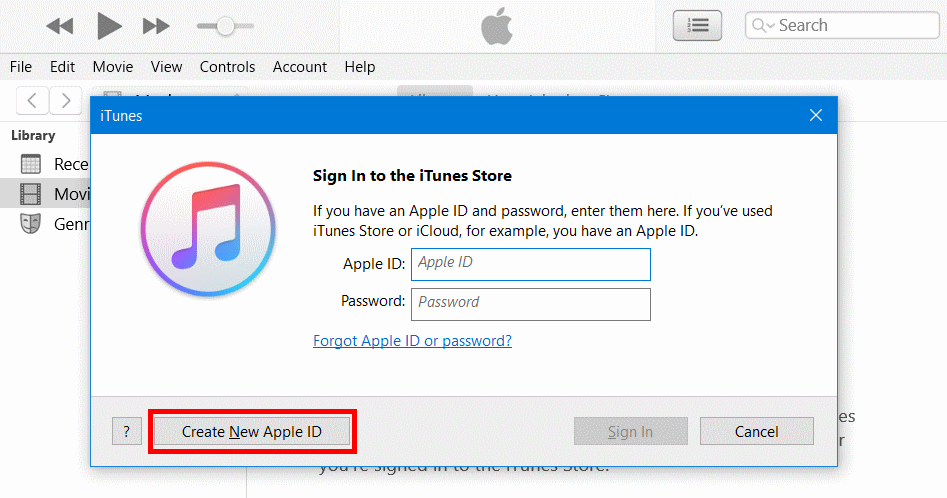
3. Click on “Create New Apple ID“
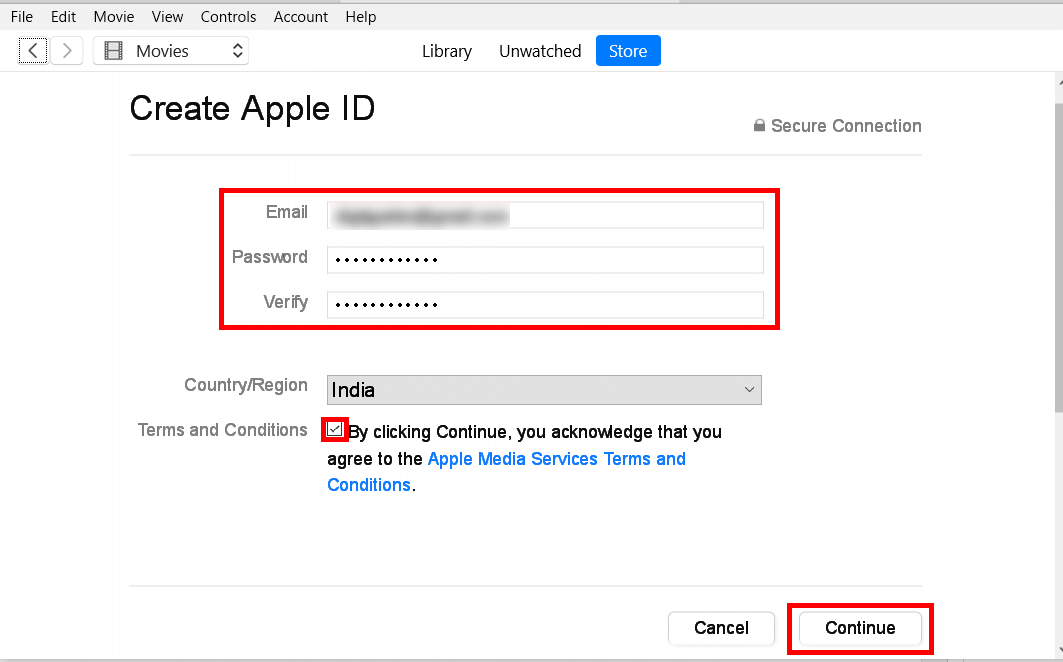
4. Click on Continue and On Create Apple ID screen, update the following details
- Email: This Email address will be your new Apple ID
- Password: Enter the password with at least 8 Characteristics that include numbers, capital letters, and lowercase letters.
- Verify Password
- Accept the terms and conditions
After updating required, click on “Continue“
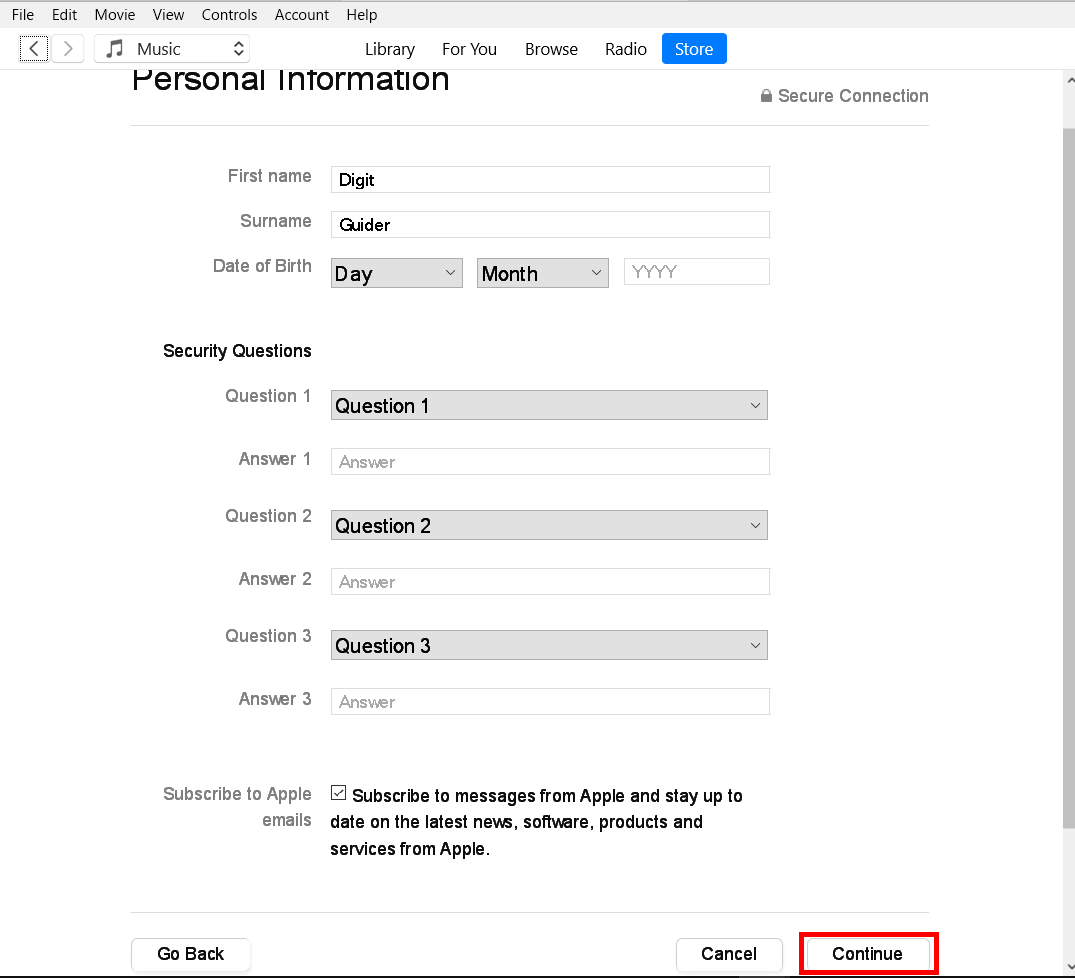
5. In the next screen, update with the following details and click on “Continue”
- Personal Information
- Security Questions
6. Now update your billing information and click on “Continue” You will be not charged until you make a purchase.
7. Check your Email for a confirmation code from Apple and verify your email by entering the verification code.

Leave a Reply